This post may contain affiliate links. When you purchase through links on our site, we may earn an affiliate commission. Read our affiliate disclosure
You will learn: 7 simple ways to update your old kitchen cabinets without replacing them. These methods include how to paint your cabinets, update the lighting, reface the cabinets, upgrade old handles or knobs, replace outdated hardware and doors, and install pull-out shelves.
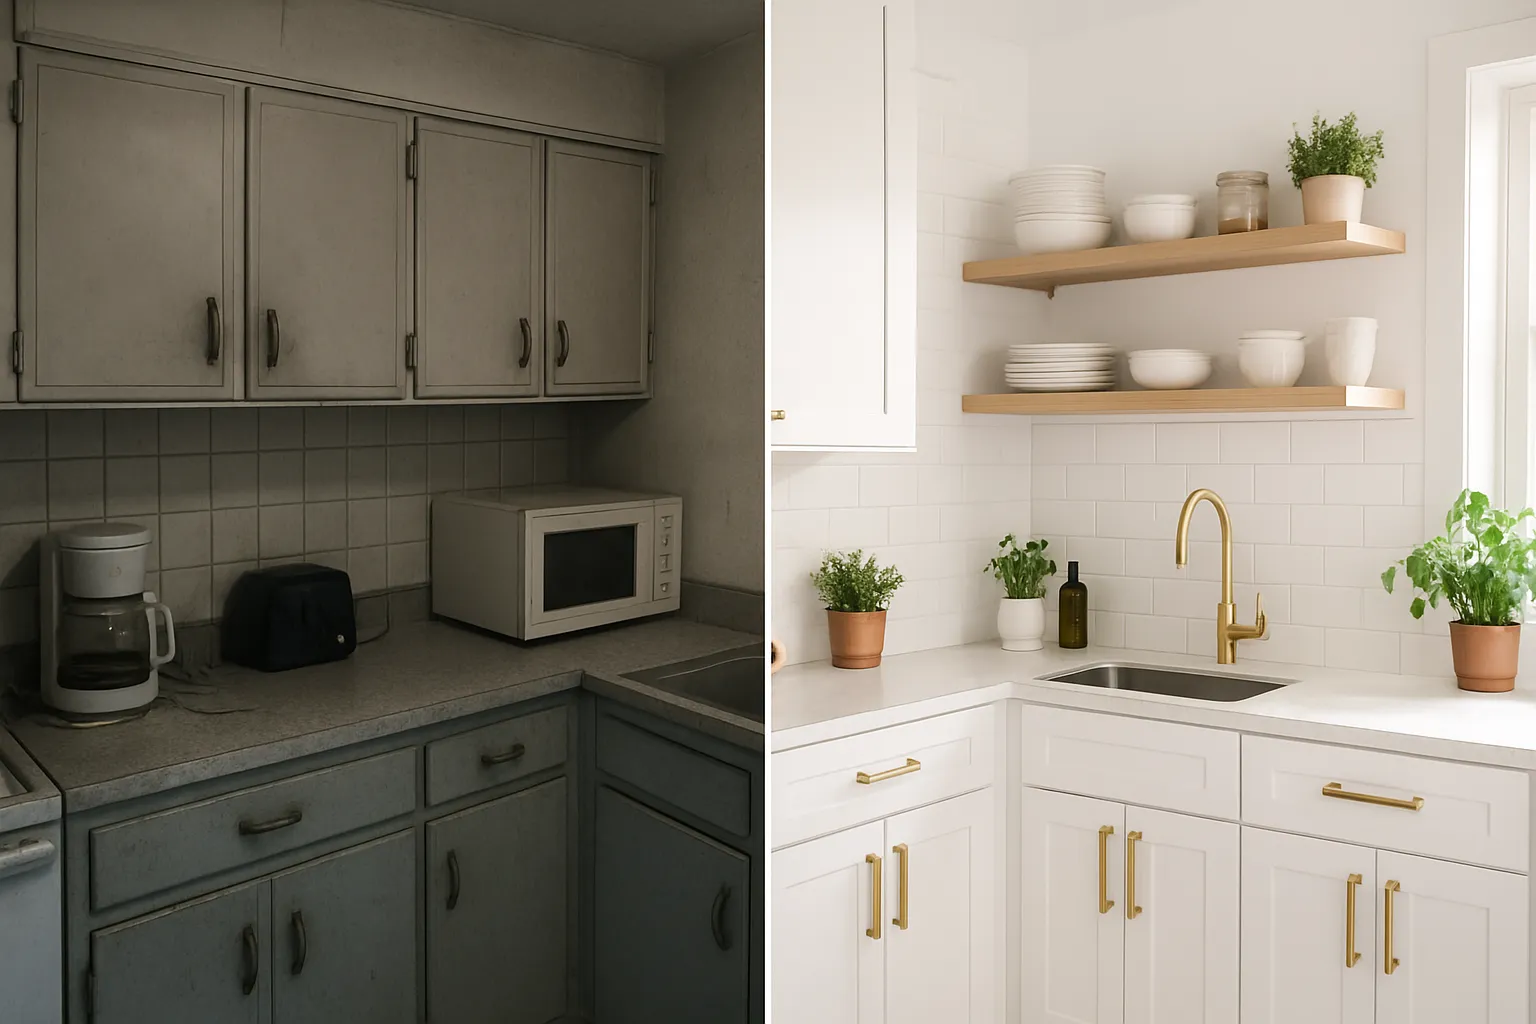
Kitchen cabinets are the backbone of any kitchen, but over time, they can start to look dated or worn. Replacing them entirely can be expensive and time-consuming, often costing thousands of dollars and requiring weeks of disruption.
Fortunately, you don’t need to rip out your cabinets to give your kitchen a fresh, modern look. With some creativity and a bit of effort, you can transform your old cabinets into something that feels brand new.
In this guide, I will show you how to update old kitchen cabinets without replacing them.
Top 7 Ideas to Update Old Kitchen Cabinets Without Replacing Them
1. Paint Your Kitchen Cabinets with Trendy Colors
One of the cheapest methods to give your kitchen a quick makeover is to paint the cabinets. Whether you want to add color and personality, brighten the area, or add a modern touch, a fresh coat of paint can make old cabinets appear brand new.
Bold selections like blue, deep green, or even two-tone combinations for a more dramatic impact are popular, as are traditional whites and light grays to make your kitchen appear bigger and more airy. Before making a final decision, feel free to experiment with color samples in a hidden or small area.
Here are a few trending and most popular color choices for your kitchen cabinet:
- Warmth & Texture (Best Option): Natural white oak mainly produces a classic, organic look.
- Warm Neutrals: To create welcoming spaces, cool grays are being replaced with creamy white, warm beige, and mushroom/taupe.
- Earthy Greens: Sage, moss, and subdued eucalyptus greens are still well-liked because they provide a peaceful, natural atmosphere.
- Deep & Moody: Rich forest green, midnight blue, and deep navy are commonly used on lower cabinets or islands.
- Sophisticated Dark: A “soft black” or “black-plum” shade (like Benjamin Moore’s Curtain Call) is gaining popularity in luxurious, high-end, and cinematic spaces.
- Key Combinations: The “tuxedo” kitchen style, featuring lighter upper cabinets (or warm wood) paired with dark lower cabinets, remains a favorite.
- Top 4 Combinations Data: Research from KBIS 2026 indicates Light Wood (20.55%), Off-White (15.75%), Green (10.27%), and Black-Wood pairings (18.80%) are the leading market choices.
Step-by-Step Instructions for Painting Your Cabinet:
- Remove all doors, drawers, and hardware; label them for easy reassembly.
- Clean surfaces thoroughly with a degreaser or warm soapy water to remove grease.
- Lightly sand with 220-grit sandpaper and wipe away dust with a cloth.
- Apply painter’s tape to protect walls and countertops.
- Prime all cabinet surfaces with a quality bonding primer.
- After primer dries, apply two thin coats of cabinet paint using a foam roller for flat areas and a brush for corners.
- Let each coat dry fully before applying the next.
- Use semi-gloss or satin cabinet paint for moisture and stain resistance.
- Allow cabinets to fix for 24–48 hours before reattaching hardware and doors.
Costs and Time:
The cost of this project typically ranges from $100 to $300, depending on your kitchen size and the quality of paint and materials you choose. With patience and attention to detail, you can dramatically enhance your kitchen’s look without the expense of a full remodel.
2. Lighting Your Cabinet
Lighting has a significant impact on how your kitchen cabinets look and work. Under-cabinet lighting may be upgraded or added to make the area appear brighter and more contemporary while also improving visibility for food preparation and cooking.
Types of Lighting:
LED strip lights: LED strip lights are cheap and easy to stick under your cabinets, then you can either plug them in, or for a more seamless look, you can hardwire them.
Puck lights: Puck lights would be nice to use inside a cabinet with glass doors to really show off your dishware, and would look beautiful! You can get battery-operated puck lights, or you can plug the puck lights in.
Tape lights: Tape lights are more flexible and can fit into oddly shaped areas. You can push the tape lights into corners or along the edges of cabinets.
Steps to install:
- Measure under your cabinets to determine how much lighting you need.
- Choose lights with your preferred color temperature—warm white (2700-3000K) creates a cozy feel.
- Clean the area under the cabinets so the lights will stick well.
- Install the lights following the manufacturer’s instructions. For plug-in lights, make sure an outlet is nearby. For hardwired lights, consider hiring an electrician if you’re not comfortable with wiring.
- Test the lights before permanently attaching them.
Pro Tip:
- Install lights inside cabinets to highlight features like glass doors, open shelves, or tile backsplashes.
- Use dimmer switches to adjust lighting for different moods.
- Use cable clips to keep wiring neat and hidden.
Improved lighting makes the space feel warm and inviting. Additionally, it improves the kitchen’s functionality and pleasure for daily duties like cooking and entertaining.
3. Refacing Your Kitchen Cabinets
A great compromise between painting and replacing cabinets is refacing them. Refacing entails preserving the current cabinet boxes while changing the cabinet doors and drawer fronts. This approach, which is sometimes 50% less expensive than installing brand-new cabinets, provides your kitchen a modern look without the expense and trouble of a complete replacement.
Step-by-Step Guide:
- Measure each cabinet door and drawer front to ensure a proper fit.
- Choose a style and finish that matches your kitchen, such as Shaker, Slab, or Raised panel, with wood veneer or painted options.
- Order new doors and drawer fronts from a trusted supplier, who may offer standard or custom sizes.
- Remove old doors, drawer fronts, and hardware. Keep or upgrade hinges and drawer runners if needed.
- Clean and prepare cabinet frames, and paint or veneer exposed areas if necessary.
- Install new doors and drawer fronts, making sure they are level, and attach hardware.
- Add or upgrade handles, knobs, hinges, and drawer runners.
If you’re skilled and equipped, you can save money by refacing your cabinets yourself. For a higher-quality finish, hiring professionals is recommended. Cabinet refacing typically costs between $1,000 and $3,000, depending on your kitchen size and material choices—significantly less than a full cabinet replacement. The process usually takes just a few days and causes minimal disruption to your home.
4. Update Your Cabinet Handles
Changing out old knobs and handles is one of the easiest and fastest ways to make your cabinets look better. With hundreds of styles to choose from, like sleek modern bar pulls and classic glass knobs, you can make a big difference in how your kitchen looks and feels in just a few hours. A single handle or knob costs between $2 and $10, so you can update a simple kitchen for less than $100. Check hardware stores or trusted online shops for finishes like brass, matte black, or brushed nickel that match your style and décor.
How to Replace Kitchen Cabinet Handles or Knobs
- Remove old knobs or handles with a screwdriver and keep the screws if they fit the new ones.
- Measure the distance between screw holes to buy the right size pulls. If switching from knobs to pulls, you may need to drill new holes and fill old ones with wood filler, then sand smooth.
- Use a guide or tape to line up and drill any new holes.
- Clean the area around the holes so the new hardware sits flat.
- Screw on the new knobs or pulls, tightening gently to avoid damaging the cabinet.
- Step back to check alignment, adjust if needed, and tighten fully.
Extra Tip:
Try to match your knobs’ material with your appliances. If you’re replacing many small knobs or pulls, label each knob and door to avoid confusion. Using a magnetic screwdriver can help hold screws in place and prevent losing them.
5. Upgrade Cabinet Hardware for Functionality
Upgrading your cabinet hardware goes beyond just replacing handles. With a variety of functional hardware options, you can refresh your kitchen’s look and make daily tasks easier.
Soft-close hinges:
Soft-close hinges stop cabinet doors from slamming, reducing noise and protecting the wood and finish. They usually cost $2 to $5 and can be installed with a screwdriver. For easy DIY, choose “clip-on” hinges. After removing old hinges, attach the new ones to the door and frame, and adjust the tension as needed.
Full-extension drawer slides:
Replace old, sticky drawers with full-extension slides for smoother use and easier access to the back of each drawer. These slides let you pull the drawer out completely to find items easily. Most new slides use the same screw holes as the old ones, but check before buying. Installation usually only requires a screwdriver or drill.
Pull-out organizers:
Install pull-out trays, baskets, or shelves inside base cabinets to keep pots, pans, and small appliances accessible. These organizers are easy to install with basic tools and often come with instructions, helping prevent items from getting lost in the back of the cabinets.
Built-in recycling and garbage cans:
Sliding rails with hidden trash cans help keep your kitchen organized and save floor space. They are easy to install and fit standard cabinets.
You can use an under-counter trash can. It works as a regular trash bin, but can also be hung up to save floor space.
Extra Tip:
Measure carefully before purchasing hinges, slides, or organizers to ensure they fit your cabinets. For optimal results, replace hardware on all cabinets and drawers simultaneously to achieve a uniform appearance and proper functioning. Using magnetic screwdrivers and a cordless drill can speed up the installation process.
6. Change the Kitchen Door Fronts for a Bold Refresh
Replacing only door fronts is a cost-effective way to dramatically update your cabinets if the boxes are still in good condition. Known as “door-only refacing,” it lets you change color, design, and material without altering the framework. New doors typically cost $20 to $100 each.
How to Pick New Cabinet Doors:
- Choose from styles like Shaker, flat-panel, or raised-panel. Shaker doors are timeless and versatile, while flat-panel doors look modern.
- Use finishes like wood veneer, painted MDF, solid wood, or thermofoil to get your preferred color.
- Measure your current doors carefully to ensure the new ones match exactly.
- If you want, add glass inserts or open shelving when replacing the doors.
Step-by-Step Guide to Install Your New Cabinet Doors:
- Remove the cabinet doors by unscrewing them from the hinges. If your cabinets differ in size, label each door’s original position to know where to reinstall them.
- Check and replace hinges if needed so doors can swing freely; soft-close hinges are a good upgrade.
- Align and screw the new doors onto the pre-drilled cabinets, ensuring they sit flush and have proper spacing.
- Adjust hinges for a perfect fit and closure.
- Add new knobs or handles for a fresh look.
- Finally, clean all cabinet doors of dust and fingerprints.
Additional Tip:
- Get samples of your door styles and finishes to check color and quality before buying.
- Pre-drilled doors are available for easier DIY.
- If you’re not skilled at drilling and measuring, hardware and cabinet stores can help with custom orders or installation.
Compared to a complete cabinet replacement, replacing the door fronts will save you time and money while modernizing your kitchen, enhancing durability, and personalizing the area to fit your taste.
7. Install a Pull-Out Cabinet Shelf for Better Storage
Retrieving items from the back of old cabinets can be difficult because they often lack the practical storage features of modern kitchens. Adding a pull-out shelf can increase storage, improve organization, and make it easier to access everyday items. Most hardware stores sell pre-made pull-out shelves in various sizes to fit standard cabinets.
Step-by-Step Instructions To Install A Pull-Out Cabinet Shelf:
Take Accurate Measurements: Measure your cabinet’s interior to determine the available space for a pull-out shelf, ensuring precise measurements for a perfect fit.
Select Appropriate Shelf Kit: Choose a shelf kit suited to your cabinet size and weight needs; options include wood, wire, or metal, with full-extension slides for better access.
Remove Existing Shelves (if applicable): Remove any shelves in the way and clean the cabinet interior before installation.
Assemble Pull-Out Shelf: Follow instructions to assemble the shelf with the correct sliders or runners, usually using a screwdriver, drill, and measuring tape.
Mount the Shelf: Place the assembled shelf inside the cabinet, align it with the front, and fasten sliders or runners with screws.
Test the Pull-Out Shelf: Extend and retract the shelf several times to ensure smooth operation, making adjustments as needed.
Extra Tip:
If you have a framed cabinet, use the right pull-out shelf kit or mounting brackets to fit the space. A cabinet can hold two pull-out shelves. Install them in the bottom kitchen cabinets to reach pots and pans or in pantries for dry goods. Label your pull-out shelf items.
Read also:
How to Remove Stains from Kitchen Countertops: A Step-by-Step Guide
How to Keep Kitchen Clean and Organized: 15 Practical Tips That Work
Top 6 Ways to Clean Your Kitchen Sink Drain (Fast & Effectively)
How to Organize the Space Under the Kitchen Sink?

My name is Mostarefa. I am a content creator and editor of ideasformyhome.com. I am an expert in home improvement. In this blog, I write about home improvement ideas, trending home decor ideas, and cleaning & organizing tips.